December 17, 2008

How to make your own Christmas Ornaments...

Christmas is my favorite time of year! I love listening to festive music, enjoying beautiful decorations, mailing out cards, shopping for gifts, and wrapping presents. All of this sets the mood to make a few special ornaments for our tree. It’s easy to cut chipboard shapes with your favorite die cut machine or purchase precut designs. Helmar Adhesives provide the perfect adhesives when working with chipboard products. It’s easy to apply with a foam craft brush, which goes on smoothly and dries quickly.


Here’s the supply list and directions to help you create your own Christmas ornaments.

Supplies:
Helmar Premium Craft Glue
Helmar Craft & Hobby PVA Glue
Helmar Scrap Dots
Making Memories Gold Glitter & tag
Prima Angelic Collection “Cherub” (810283), “Wings” (810313) and “Angel Kisses” (810276)
Prima Center Kissed Ivory Jewels (524951)
Prima Angelic Ribbons (810184), Dude Ribbon (820053)
Prima Flowers (519223)
Rusty Pickle Grinch-mas Chipboard Ornaments

Directions:

1. Cut out chipboard or use precut chipboard designs.
2. Apply Helmar Craft & Hobby PVA Glue evenly onto the chipboard shape.
3. Place on a piece of pattern paper, here I used Prima Angelic Collection.
4. Trim around the ornament with a sharp blade.
5. Repeat process until all sides of chipboard is covered with pattern papers.
6. The Helmar Premium Craft Glue is perfect to adhere the lace to the photo frame. The glue goes on evenly, dries clear and sets quickly.
7. Embellish the ornaments using the Helmar Scrap Dots to attach flowers, jewels and tags.
8. The twist top on the Helmar Craft & Hobby PVA Glue allows you to apply glue to the edges of the ornament so glitter can be added to the edges.
9. Add ribbon to the ornaments.
10. Give the ornaments as a gift or enjoy on your own tree!

Merry Christmas!

December 13, 2008

Quick and Easy Christmas Gifts made with....

the Zutter Bind-it-all and DeamKuts tools.

Do you have a long list of gifts to make yet you are short on time? Create mini albums using the Bind-It-All and DreamKuts Innovative Tools. Cut chipboard out and cover it with your favorite pattern papers and embellishments. The page inserts were created using a single sheet of cardstock cut with the DreamKuts tool. I love the look and texture of ribbons; they look great tied to the Zutter OWires. Now you are ready for the holidays!

A tip to making these mini albums so quickly: choose coordinating colors and embellishments. By choosing similar product colors and working with one theme, the work flows faster.

My Zutter Zisters Design Team Friends have been busy creating some wonderful Christmas projects, please check out http://binditall.blogspot.com/ for more inspiration.


Supplies Used:
K&Co Papers
Cardstock – Bazzill
My Mind’s Eye Time to Time Ephemera
Making Memories Rub-ons
Antique Brass 3/4” O’wire
Chipboard
Tools Used:
Zutter Bind-it-All
Zutter DreamKuts
Zutter Wire Cutters
Fiskars – Paper Trimmer
EK Success – Scissors

December 7, 2008

Final presentation for class....

Whew, I am making my final portfolio presentation for my Drawing I class Monday night. I can see the light at the end of the tunnel. I have enjoyed taking both painting and drawing classes this semester. It’s not always easy working all day, taking classes at night and playing catch up on the weekends. I plan on taking a break for the spring so I can focus on the family. My “baby” will be graduating in May and I want to attend all his track meets in the spring.

I wanted to share a few of my projects that I created for my Drawing I class.


December 2, 2008

I can finally share this good news....

When I recieved the phone call from Tracy, I wanted to scream out loud. Only it wouldn't have been a secret, I was in the midst of checking out at Hobby Lobby. I am thrilled to announce that I have been chosen to be a part of the very first Design Team for Helmar Adhesives. Please check out the new official HELMAR blog at http://www.helmarusa.typepad.com/ for giveaways, contests, guest designer announcements, project photo galleries, design team projects & articles and much more!


Helmar's USA Design Team:

Tracy Weinzapfel Burgos, Design Team Coordinator
Jenna Franklin
Amber Hillman
Laura Achilles
Carla Schauer
Tish Treadaway
Jennifer Beason
Marci Knecht
Beth Root
Becky Teichmiller

November 26, 2008

A love of family is life's greatest blessing...

As I approached the Thanksgiving Holidays, I wanted to create something for the occasion. This album reflects just one of the many blessings in my life, my family! They play a big role in shaping and molding me into the person I am today. I appreciate their love and support for all that do. So, I hope this album inspires you to call a friend, give someone you love a hug and maybe craft a special card or gift for them this holiday season.

Wishing you and your family a Happy Thanksgiving!

November 23, 2008

An attitude of gratitude...

I’m so excited that Thanksgiving is this week! I love having the kids come home, enjoy a traditional turkey dinner and prepare for Christmas. Thanksgiving is a time to think about all of our blessings. To help with this, I made a few gratitude journals. Wouldn’t it be nice if family and friends that come over would join in, write a few thoughts and feelings in the journal? (Hint Hint family) This could be an ongoing book, which can be pulled and added to it each year! I would love to hear about your family traditions, please post and share.

Wishing you and your family a Happy Thanksgiving!!!

Bo-bunny Beau Jardin Bleu Papers and Cutouts,
Bo-bunny Buttons , Bo-bunny Fancy Frills Acrylic Stamp,
Michael's Ribbon and Impress Ons by Art Warehouse

Bo-bunny Beau Jardin Harvest Paper and Cutouts,
Bo-bunny Fancy Frills Acrylic Stamp, Bo-bunny Chocolate
Double Dot Ribbon and Bella Journee Ribbon ,
Colorbox Ink, EK Success Metallic Adornaments,
On the Surface Fibers, Prima Duo Acrylic “g” stamp
Bo-bunny Beau Jardin Wine, Bo-bunny Flower, Bo-bunny
Aquamarine Double Dot Ribbon and Bella Journee Ribbon,
Paper Reflections Corrugated Paper, It Takes Two Scripture Stickers,
On the Surface Fibers, Colorbox Ink and Impress ons by Art Warehouse

November 15, 2008

Zutter Innovative is having a BLUE Sale.

(Supplies: Bind-It-All Zutter 5/8” Wire, Starbucks Cup Holder,
Making Memories Cardstock, Bo-bunny Journaling Stamp,
Colorbox and StazOn Black Ink, Making Memories and
Narratives Rub-ons, Adornaments Fun Fibers – Vegetation
Offray Sheer Ribbon, KI Memoires ice candy “I love you”
I Kan dee Twist tie

This little album was created using the Zutter Bind-It-All and a Starbucks cup holder. A great gift for the coffee lover in your life! If you like making your own albums such as this, check out the Zutter Bind-It-All link for more information. http://binditall.blogspot.com/2008/11/big-blue-savings.html

Zutter Innovative is having a BLUE Sale. The original BLUE Dreamkuts and the original BLUE Bag-a-Bind are both on clearance status, and priced at 33% off original prices. Get 'em while they last. If you purchase there, you get some bonuses with $50+ purchase.The blue Dreamkuts is identical to the new pink version - the only difference is the color. So if you are more of a blue person than a pink, this is the time to buy! Drop some not-so-subtle hints for holiday gifts ; )

November 12, 2008

Here are a few more gift ideas...

Here are some more gift ideas. If you start now, you will be able to create special gifts for friends and family.
A set of monogram mini-albums using the Bind-It-All machine,
Prima papers and products.

Journals are quick and easy gift idea. Here I
used Bo-bunny papers and flowers on this one.

A music treasure box created using Bo-bunny papers
and shells collected from my summer vacation.

I picked up some wood bangles at my local craft store.
Use double stick tape on the inside of the bracelet and ribbon. Voila!

I hope that I was able to inspire you in this blog post to create your own special gifts this holiday season..

November 9, 2008

The holidays are approaching are you ready????

The stores are already set up with the Christmas décor and music playing in the background. It’s time to get ready for the holidays! Here are some gift ideas that you can create for friends, family members and co-workers. These are all quick, easy and inexpensive items to create. What better gift to give than one from the heart!

A set of coaster frames, personalize with Bo-bunny Papers,
embellishements from your tool box and your own photos.
Personalize an inexpensive clock with Bo-bunny papers and stickers.

Here are some wood trays from Prima Flowers
decorated with Prima paper and flowers.
I had glass cut at a hobby store to protect photos.

Are you aware that Prima Flowers has a
complete line of Eco Wood Products?
Personalize your office with these wood
desk accessories decorated with Prima Products.

I find a lot of picture frames on the clearance
isles of stores. Here is one that I sanded to
created a distressed look then used Bo-bunny
papers, flowers and rub-ons for a unique look.

Okay girls, we have a lot of scrapbook tins and
cute packaging available. Here is a Bo-bunny flower tin
cleaned, filled with a sweet treat and embellished
with Bo-bunny ribbons and tags.

I hope you feel inspired to start crafting your gifts now for the upcoming holiday season. I would love for you to post a comment with some of your Christmas craft ideas!

November 4, 2008

Autumn Spendor

Now that we are in the midst of fall, we turn our thoughts towards home. This is a time to devote to our family, plan for Thanksgiving and prepare for the upcoming Christmas holidays. Bo-bunny Spendor Collection is perfect for these events. Here are a few projects to jumpstart your creativity…

Supplies Used: Bo-bunny Splendor Vine, Paisley and Stripe,
Bo-bunny Brads, Bo-bunny Buttercup Flowers, Bo-bunny Splendor Cutout,
Lil’d Davis Designs Chipboard Words and Karen Foster Scrappers Floss.

November 2, 2008

Zutter Bind-it-all gives Maya Road Car an overhaul...

Zutter Innovative products helped me give my Maya Road chipboard car mini album an overhaul. The car was on display at my LSS and later used as a class sample. This little car experienced a lot wear and tear causing the spine to break. The car sat parked on my scrapbook desk waiting for a solution. As I worked on my design team samples, it came to me, why not update the spine with my Bind-it-all tool? I used a sharp blade to separate all the album pages, lightly sanded the edges to smooth the surface and then I touched it up with paint. The button wheels had to be removed to enable the front and back pages to fit into the Bind-it-all machine. Once all the pages were punched, the 1” wire put on, wheels reattached and ribbon tied on the spine, the car was good as new!


October 30, 2008

Happy Halloween!

Wishing you a Happy Halloween. Here's a little inspiration for all those pictures you plan on taking.


Supplies Used:
Prima Pattern Papers
Prima Felt Flourish
Prima Flowers
Prima Journaling
Prima Rub-ons
Supplies Used:
Scarry Card
Prima Little Boo Collection “Fiery Mansion” (860172)
Prima Little Boo Collection “Spooky” (860165)
Prima Little Boo Rub Ons (860226)
DMD Inc, Paper Reflections 5 x 7 Card (6 09636 01200 7)

Spooktacular Card
Prima Little Boo Collection “Haunted Mansion” (860189)
Prima Little Boo Collection “Fiery Mansion” (860172)
Prima Little Boo Rub Ons (860226)
DMD Inc, Paper Reflections 5 x 7 Card (6 09636 01200 7)
Bo-bunny Rub Ons

Boo Card
Prima Little Boo Collection “Night Owl” (860202)
Prima Little Boo Collection “Spooky” (860165)
Prima Esprit Black (518424)
Prima Mixed Fancies Purple (518585)
Prima Say it in crystals (517915)
DMD, Inc Paper Reflections 5 x 7 Card (6 09636 01200 7)
Supplies Used:
Bo-bunny Concord Dot (12CDD677)
Bo-bunny Spooktastic Haunted (12SHH550)
Bo-bunny Spooktastic Stripe (12SSS74)
Bo-bunny All Dressed UP Cardstock Stickers I10ADCS666)
Bo-bunny WR Clover Double Dot Ribbon (WRCL065)
Creative Impressions Mini Spiral Clip

Supplies Used:
Bo-bunny Journal Acrylic Stamp (SSJ512)
Bo-bunny Spooktastic Friends (12SP543)
Bo-bunny Spooktastic Stripe (12SS574)
Bo-bunny Spooktastic Cutout Tag 12(STC680)
Bo-bunny Double Dot Ribbon
Bazzill Library Pocket
StazOn Opaque Cotton White Ink

Supplies Used:
Prima Little Boo Collection “Spooky” (860165)
Prima Little Boo Collection “Eerie Apparition” (860219)
Prima Say it in crystals (517311)
Prima Halloween Rub-ons
Prima Purple Cardstock
Black Cardstock
Color Box Charcoal Chalk
Black Diamond Stickles

October 29, 2008

Too Cute to Spook!!!


This is a quick and easy way to scrapbook your Halloween photos. The Bo-bunny Spooktastic Cutout sheet is cut up for the album pages, the Bind-it-all to punch and the 5/8” black wire to create this little album. Tie a little ribbon and you are done. I added a ghost rub-on to a clear transparency, trimmed around it and tied it on the spine. Create this as a party favor, only takes one sheet of cutouts to make the entire album!

Technique: Place ghost rub-on a transparency, trim and tie on spine. Gives the illusion that it’s floating on book.


Supplies Used:
Bo-bunny Spooktastic Stripe (12SS574) and Spooktastic Friends (12SP543)
Bo-bunny12” Spooktastic Cutout (12STC680)
Bo-bunny Moster Mash Rub-ons (RBM831)
Bo-bunny Double Dot Ribbon
Zutter 5/8” Black Wires (2652)
Close to my Heart Black Sheer Ribbon (Z117)
Prima Black Tie Collection (518271)
Prima Transparencies (880996)
May Arts Green Ric Rac Ribbon
On the Surface Black Magic Fiber (MAT125)

October 26, 2008

Boo to you!

Okay this is a fun tradition and I never even thought of how it could spread on the blog. Julia Sandvoss who is the head of our design team just did a fun post on the Bo Bunny blog at http://bobunny.blogspot.com/

The Bo-bunny Blog Post...

If you're not familiar with this...it a cute Halloween tradition. It involves...a Ghost, like you see here, that is given, along with a note or poem...and the best part a treat. Then you take those...place them at a neighbor's or friends door, ring the bell and run. The recipient then posts the Ghost on their window so others know they've been BOOed and now it's their turn to do the same for someone else. It's simply fun...and such a good feeling to do something special for others. We started doing this a few years ago. And I have to say..it was very fun to have someone BOO us!

So...how can you get BOOed? Well as much as I'd like to leave candy and treats at your door many of us are far apart, (we have readers from South Africa and Norway and China )...the BOO will work through the Blog network.

Here's how to join us:

We'd like to ask for those that have a blog, that you add the Bo Bunny Blog to your Favorite Links. If you've already done this..that's fine too. I've been visiting your blogs and would like to see you sharing and spreading the word about our Blog.

Simply add our link to your blog links. Then pop back here and post a comment leaving a link to your blog. You have until next Thursday, October 30th at Midnight PST.

Then come Halloween, I'll visit those links to your blog...and some lucky people will receive a BOO from me! If you do...you'll receive some oh so fun Bo Bunny goodies to enjoy for a yummy way to celebrate Halloween. And maybe a bit heathier than all those Twix and Kit Kats!!LOL

And last for those loyal readers of ours that do not have a blog to participate...leave me a comment with a favorite Halloween tradition or even your favorite candy..or a simple BOO will do!!

BOO to YOU!!!

October 25, 2008

Free Online Scrapbooking Magazine

Have you heard about Scrapbooking.com, a free online scrapbook magazine? I don't think scrapbooking has to be an expensive hobby, take advantage of this free publications for scrapbook ideas. Here's the link if you are interested in looking at it,

http://scrapbooking.com/cgi-bin/Phase_2/cover.pl

If you decide to subscribe to this free magazine, please put my name in the referal box. This is their annual Refer-a-Friend time. If you haven't heard about this contest, all one has to do is forward the weekly newlsetter to friends. If they sign up and tell them you referred them, they will put your name on the list and randomly rewared several subscribers with the latest craft products.

Many of you know me, I love to enter contests. This one is easy, promoting a free electronic magazine.

Hope you enjoy it!

October 18, 2008

Field Trip

In the evenings, I take art classes at the local community college. This week, the teacher took us on a field trip to the Mint Museum of Craft + Design. It was college night, offering a free tour of the museum along with food, live music, and a brooch making activity. Wow, an evening of inspiration and an opportunity to get to know others in the class on a personal level. I left that evening with a fresh new look on art, new friends and not to mention this cute little pin. Thank you Elizabeth for a break from our regular classroom routine!

October 10, 2008

Spooktastic Month

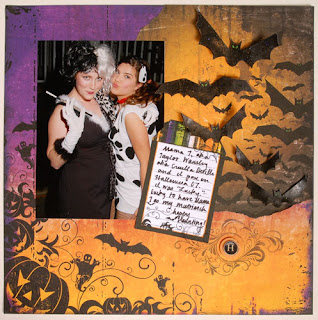
It’s the month of October and the store displays are filled with costumes and supplies for upcoming Halloween festivities. This sets the mood and is my inspiration for the following project.


Halloween Layout Supplies: Bo-bunny Journal Acrylic StampBo-bunny Spooktastic Haunted PaperBo-bunny Spooktastic Batty PaperBo-bunny Spooktastic Cutout TagBo-bunny ButtonBo-bunny has a Spooktastic Line of papers, cardstock stickers and cutouts.

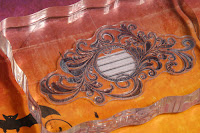
The Spooktastic Haunted paper emphasizes bats and flourish swirls throughout. I choose a stamp that will enhance the overall design in your pattern paper as this flourish journaling acrylic stamp by Bo-bunny. Tear the bats from the Bo-bunny Batty paper and adhere to the Haunted paper. Add photo and journaling tag to layout. Cut out bats from one sheet of Batty Paper, rub stickles on the bats and adhere with 3-dimensional foam to give the illusion that they are in flight. Apply the masking technique with the swirl journaling stamp to the layout. Apply a button and sticker embellishment to the center of the stamped image.

What’s masking? It isn’t just costuming that hides your face but also a stamp technique. Masking allows you to manipulate a stamped image, creating a unique, one-of-a-kind result for your projects. Once you’ve mastered simple masking, you can utilize this technique with multiple stamps to create a layered effect, but first, let’s start with the basics …


(1) First, stamp image on a piece of scrap paper.
(2) Cut around the area that will be your mask; in this case, it is the journaling lines.(3) Place the mask on your layout or card stock project.
(4) Carefully line up the stamp over the mask area and stamp the image with an even pressure. With the Bo-bunny clear acrylic stamps, this technique is even easier since you can effortlessly line up your image.

(5) Remove the stamp and mask to see the final image.
(6) Stamp the journaling tag to unify the theme; repetition of the stamp helps coordinate the layout!


Masking Tips
  • To ensure that the mask stays in place, use a temporary adhesive on the back of the image or stamp image on a Post-It® note.

  • It takes time and patience to cut out some mask images, save the pieces in your stamp and store cases along with your stamps so they are available to use again.


  • Practice a few times on scrap paper until you feel comfortable with this technique.


  • For a more complicated, layered effect, try masking with multiple stamps. Although this requires more forethought and practice, the results are well worth the effort. Remember, with Bo-bunny stamps, the possibilities are endless!
I hope you enjoyed this project and will apply the masking technique to your projects this month. Please check out http://www.bobunny.com/ for more ideas and inspiration!