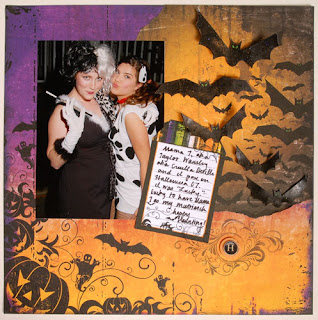
Halloween Layout Supplies: Bo-bunny Journal Acrylic StampBo-bunny Spooktastic Haunted PaperBo-bunny Spooktastic Batty PaperBo-bunny Spooktastic Cutout TagBo-bunny ButtonBo-bunny has a Spooktastic Line of papers, cardstock stickers and cutouts.
The Spooktastic Haunted paper emphasizes bats and flourish swirls throughout. I choose a stamp that will enhance the overall design in your pattern paper as this flourish journaling acrylic stamp by Bo-bunny. Tear the bats from the Bo-bunny Batty paper and adhere to the Haunted paper. Add photo and journaling tag to layout. Cut out bats from one sheet of Batty Paper, rub stickles on the bats and adhere with 3-dimensional foam to give the illusion that they are in flight. Apply the masking technique with the swirl journaling stamp to the layout. Apply a button and sticker embellishment to the center of the stamped image.
What’s masking? It isn’t just costuming that hides your face but also a stamp technique. Masking allows you to manipulate a stamped image, creating a unique, one-of-a-kind result for your projects. Once you’ve mastered simple masking, you can utilize this technique with multiple stamps to create a layered effect, but first, let’s start with the basics …
 (1) First, stamp image on a piece of scrap paper.
(2) Cut around the area that will be your mask; in this case, it is the journaling lines.(3) Place the mask on your layout or card stock project.
(4) Carefully line up the stamp over the mask area and stamp the image with an even pressure. With the Bo-bunny clear acrylic stamps, this technique is even easier since you can effortlessly line up your image.

(5) Remove the stamp and mask to see the final image.
(6) Stamp the journaling tag to unify the theme; repetition of the stamp helps coordinate the layout!
Masking Tips
- To ensure that the mask stays in place, use a temporary adhesive on the back of the image or stamp image on a Post-It® note.
- It takes time and patience to cut out some mask images, save the pieces in your stamp and store cases along with your stamps so they are available to use again.
- Practice a few times on scrap paper until you feel comfortable with this technique.
- For a more complicated, layered effect, try masking with multiple stamps. Although this requires more forethought and practice, the results are well worth the effort. Remember, with Bo-bunny stamps, the possibilities are endless!
I hope you enjoyed this project and will apply the masking technique to your projects this month. Please check out http://www.bobunny.com/ for more ideas and inspiration!


2 comments:
Love you Halloween LO.. those bats are cute! Your tutorial on masking is great too!
Fun layout! I love the colors. =)
Post a Comment